
Getting Started
This guide sets up your laptop for Informatics 1. It takes about 30 minutes, most of it waiting for downloads.
When you are done you will have:
- Python 3.14, with
pythonandpipworking in the terminal - Visual Studio Code (VS Code) with the Python extension
- Git
- A GitHub account
- Your GitHub account linked to the course, and your first exercise open in VS Code
The instructions are written for Windows 10/11. macOS steps are given where they differ. If you use Linux, you probably know what to do; ask us if not.
If you get stuck at any step, don't worry. Write down the exact error message (or take a screenshot) and show it to a tutor.
1. Install Python 3.14
Windows
Since Python 3.14, Python on Windows is installed with the Python install
manager. You install the manager once, and it installs and updates Python
for you. (The old python-3.14.x-amd64.exe installer still exists but is
being phased out. Don't use it unless the steps below fail.)
a) Remove old Python versions (if you have any).
Click Start, open Installed apps, and search for "Python". If you see older entries like "Python 3.11" or "Python Launcher", uninstall them. Old installations are the most common cause of "the wrong Python runs" problems.
b) Install the Python install manager.
Pick one of these:
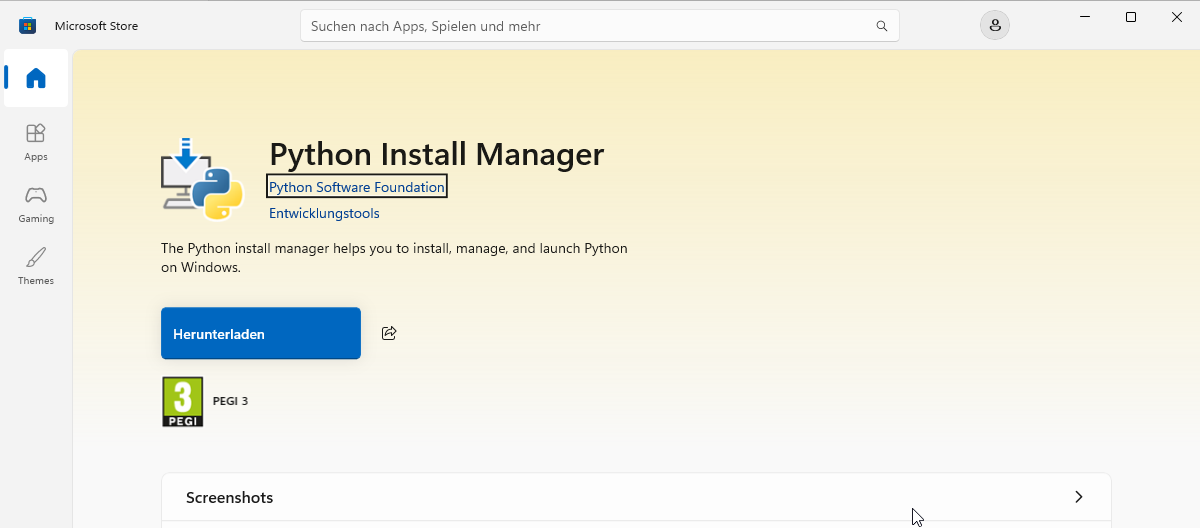
- Microsoft Store (easiest): open the Python install manager in the Microsoft Store and click Install (on German Windows: Herunterladen). Make sure the app is called "Python Install Manager" and is published by the Python Software Foundation. Don't pick one of the older "Python 3.x" Store apps.
- python.org: go to https://www.python.org/downloads/, click the big
download button for Windows, and run the downloaded
.msixfile. Click Install.
c) Open a terminal.
Click Start, type Terminal, and open it. (On Windows 10, open
PowerShell instead.) A window with a blinking cursor appears. This is
where you type commands. Press Enter after each command.
d) Install Python 3.14.
Type:
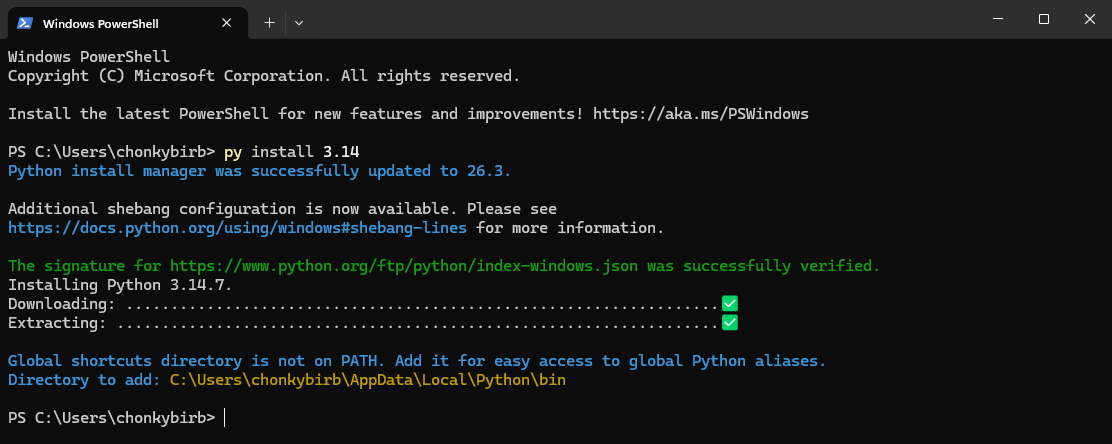
py install 3.14
This downloads and installs the latest Python 3.14 release. It ends with a note that the "global shortcuts directory is not on PATH". The next step fixes that.
e) Put Python and pip on your PATH.
PATH is the list of folders Windows searches when you type a command. Run the configuration helper:
py install --configure
It checks your system and asks a few questions. Answer them like this:
| Question | Answer |
|---|---|
Windows is not configured to allow paths longer than 260 characters. ... Update setting now? [y/N] |
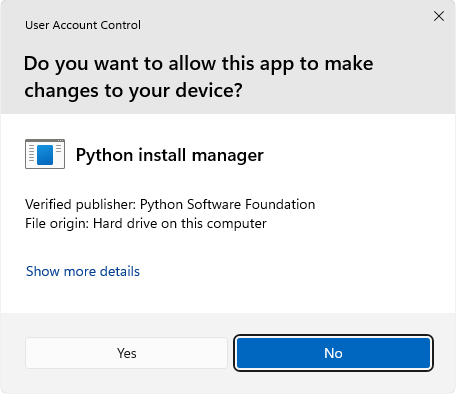
y. Windows asks "Do you want to allow this app to make changes to your device?" for Python install manager; click Yes. If you can't give administrator permission, answer n instead. |
The legacy 'py' command is still installed. ... Open Installed apps now? [y/N] |
y, then uninstall Python launcher (see step a) |
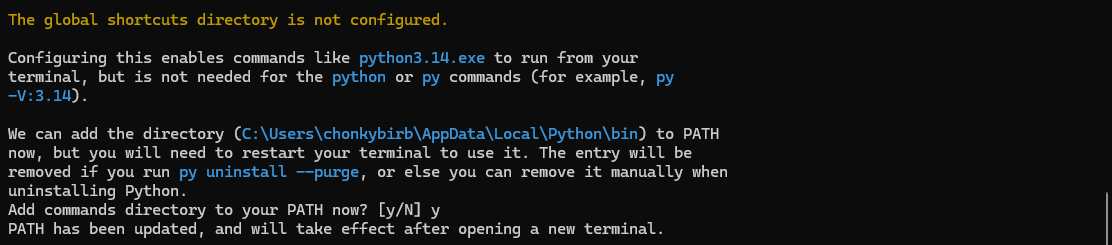
The global shortcuts directory is not configured. ... Add commands directory to your PATH now? [y/N] |
y. This one matters, because it makes the pip command work |
You do not have the latest Python runtime. ... Install CPython now? [Y/n] |
n (we use 3.14, which you installed in step d) |
Most of these questions default to No, so you have to type y
yourself. You probably won't see every question, because the helper only
asks about things that need fixing. At the end it prints
Configuration checks completed.
f) Close the terminal and open a new one. PATH changes only apply to newly opened terminals.
macOS
- Go to https://www.python.org/downloads/macos/ and download the
macOS 64-bit universal2 installer for the latest Python 3.14 release
(a
.pkgfile). - Open it and click through the installer with the default options. Leave "Shell profile updater" selected, because it puts Python on your PATH.
- When it finishes, a Finder window for
/Applications/Python 3.14opens. Double-click Install Certificates.command. Without this, downloading packages can fail with SSL errors. - Open Terminal (press Cmd+Space and type "Terminal").
On macOS the commands are called python3 and pip3, not python and
pip. Use those names wherever this guide says python or pip.
Check that it works
In a new terminal window, run:
python --version
pip --version
You should see something like:
Python 3.14.7
pip 26.2.1 from C:\Users\<you>\AppData\Local\Python\pythoncore-3.14-64\Lib\site-packages\pip (python 3.14)
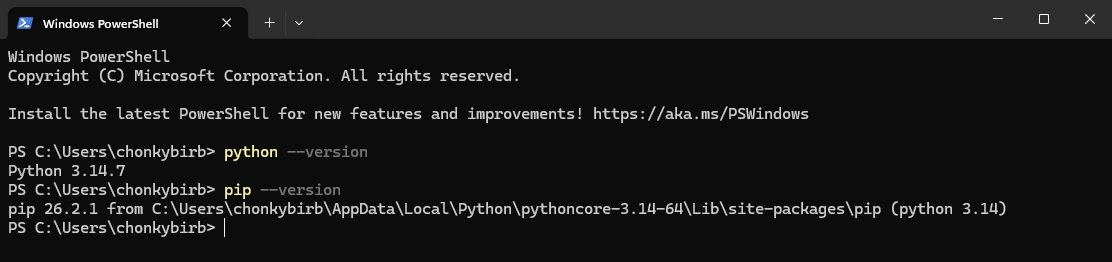
The exact numbers may differ. What matters is that the first line says 3.14 and the second line mentions python 3.14.
If it doesn't work:
| Problem | Fix |
|---|---|
python opens the Microsoft Store, or says "not recognized" |
Click Start, open Manage app execution aliases, and turn on the entries labelled Python (default) and Python install manager. If they are already on, turn them off and on again. Open a new terminal. |
python --version shows an old version (e.g. 3.11) |
An old Python is still installed. Uninstall it (step 1a) and open a new terminal. |
pip is "not recognized" but python works |
Run py install --refresh, then py install --configure and answer y to the PATH question. Open a new terminal. As a workaround, python -m pip always works in place of pip. |
2. Install Visual Studio Code
VS Code is the editor we use to write and run code in the labs.
- Download it from https://code.visualstudio.com/download. On Windows, choose the User Installer, x64 (or Arm64 if your laptop has an Arm processor, e.g. Snapdragon).
- Run the installer and accept the license agreement. Keep clicking Next. On the Select Additional Tasks page, make sure Add to PATH is checked (it is by default). The two "Add 'Open with Code' action" boxes are optional but handy.
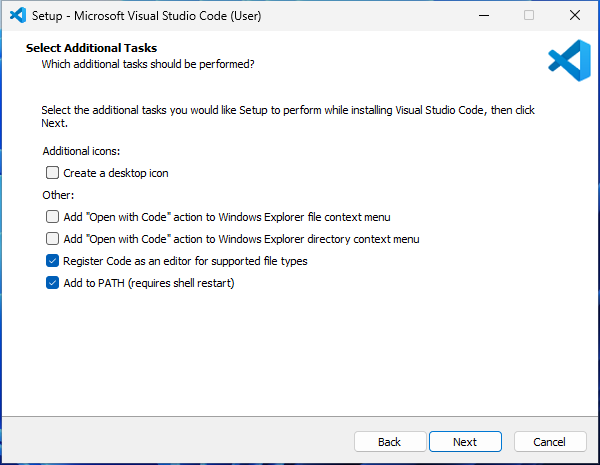
- Click Install, then Finish. VS Code starts.
- VS Code greets you with Welcome to VS Code and asks you to sign in to use GitHub Copilot. Click Continue without Signing In at the bottom. On the next page you can pick a colour theme, then click Get Started.
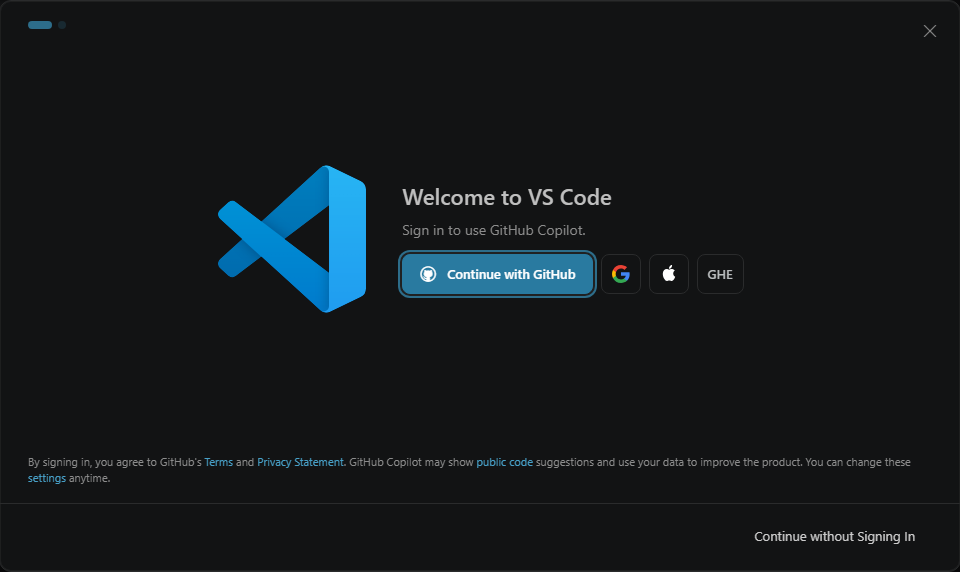
Install the Python extension:
- Click the Extensions icon in the left sidebar (four squares), or press Ctrl+Shift+X (Cmd+Shift+X on macOS).
- Search for
Python, pick the one published by Microsoft, and click Install. It also installs a few helper extensions (Pylance, Python Debugger, Python Environments). This can take a few minutes; wait until the extensions no longer say "Installing".
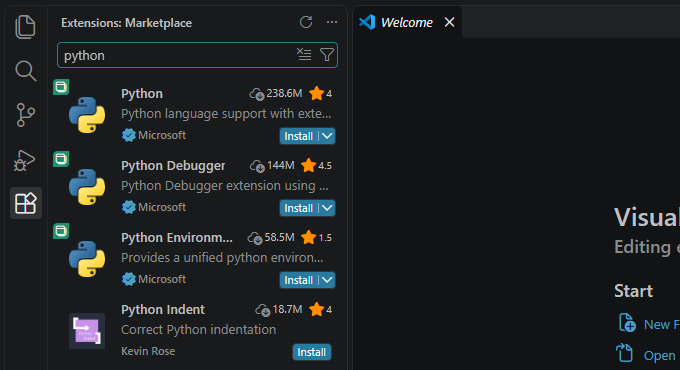
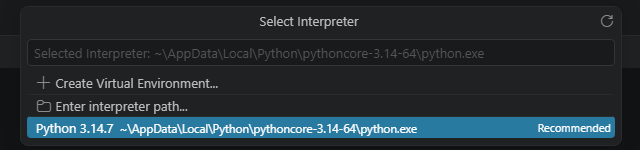
Pick Python 3.14 as the interpreter:
- Press Ctrl+Shift+P (Cmd+Shift+P on macOS) and type
Python: Select Interpreter. Press Enter. - Choose the entry that says Python 3.14. It is usually marked Recommended.
3. Install Git
Git downloads your exercise repositories and uploads your solutions. VS Code uses it in the background.
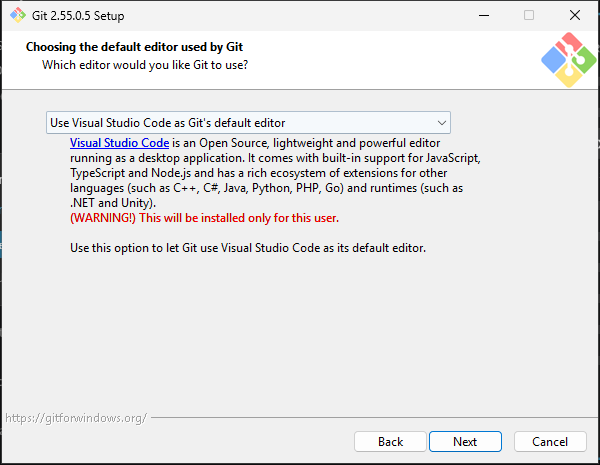
- Windows: download it from https://git-scm.com/downloads/win ("Git for Windows/x64 Setup") and run the installer. Click Yes when Windows asks for permission. The installer asks many questions; the defaults are fine for all of them, so keep clicking Next. One tip: on the Choosing the default editor used by Git page, pick Use Visual Studio Code as Git's default editor instead of Vim. On the last page click Finish.
- macOS: open Terminal and run
git --version. If Git is not installed, macOS offers to install the "command line developer tools". Click Install.
Check it in a new terminal:
git --version
It should print something like git version 2.55.0.windows.5.
4. Create a GitHub account
GitHub is where your exercises live. Skip this step if you already have an account.
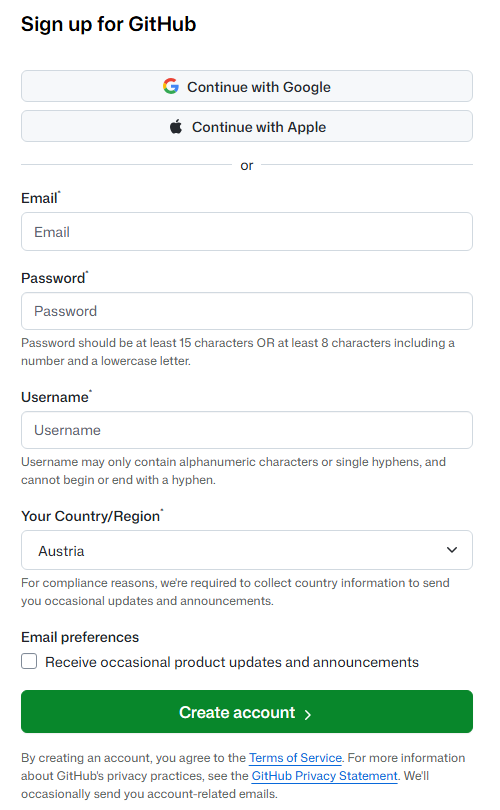
- Go to https://github.com/signup.
- Enter your email address, a password, and a username, and check that Your Country/Region is right. Then click Create account.
- Use an email address you check regularly. Your university address works.
- Choose a username you are happy to keep. Other people will see it.
- Solve the verification puzzle and enter the code GitHub emails you.
- You can skip the personalisation questions.
Stay logged in to GitHub in your browser for the next step.
5. Log in to the course page
The course page shows your exercises and how your solutions are doing.
- Go to https://informatics-1.tugraz.pothos.dev and click Log in with GitHub.
- GitHub asks whether to let Informatics I see your public profile. Click Authorize. The course page learns only your username.
- First time only: pick your own name from the list and type your Matrikelnummer to confirm. Then click Link my account. This is how we know whose work we're grading. If your name is missing, don't pick another one. Tell us in the lab.
6. Get your copy of an exercise
Each exercise is a repository on GitHub. You make your own copy of it (a fork) and push your solution there. The course page lists every exercise that is open, starting with 00 - Hello World.
- Accept the invitation. When an exercise opens, GitHub emails you an invitation to its repository. Click Accept the invitation on the course page (or in the email), then Accept invitation on GitHub.
- Fork it. Click Fork the repository on the course page. On GitHub, leave everything as it is and click Create fork. Your fork is private: only you and the tutors can see it.
- Open it in VS Code. Back on the course page, press Refresh,
then click Open it in VS Code. If the browser asks whether to open
Visual Studio Code, allow it. VS Code asks where to put the exercise:
pick a folder you will find again, e.g.
Documents\informatics-1, then click Open when it has finished downloading. - If VS Code asks you to sign in to GitHub, click Allow and log in in the browser window that opens.
- When VS Code asks "Do you trust the authors of the files in this folder?", click Yes, I trust the authors.
Hand in by committing and pushing: in VS Code open Source Control (Ctrl+Shift+G), type a message, click Commit, then Sync Changes. Then press Refresh on the course page to see your commits and how many tests pass. You can push as often as you like before the deadline; the last push counts.
You're done
You should now have the Hello World exercise open in VS Code. Open the terminal inside VS Code (Terminal → New Terminal) and run:
python --version
If it shows Python 3.14, you're all set.